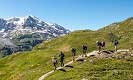
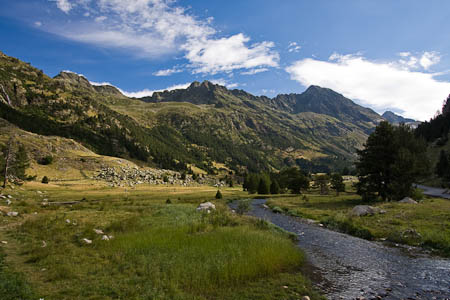
The Silvretta Alps is the perfect location to undertake your first multi-day hut to hut splitboarding adventure. The Silvretta Alps consist of seventy 3000m peaks along the Austrian/Swiss border. It includes the highest peak in the region Piz Buin (3312m). On this trip, you will have the chance to bag a number of non-technical 3000m peaks. The area is glaciated, giving its alternative name, Blue Silvretta.
The tour starts and finishes just 50 minutes from Innsbruck in Landeck, the main town at the head of the Paznaun valley. Our partner hotel is the ideal location to gather the team ahead of this week of backcountry riding. On the first night, you will meet the team of like-minded and ability matched riders. Your guide will brief you on the week ahead including snow and weather conditions and an equipment check before dinner.
Once we leave the hotel we will be staying in the high mountains each night. The huts - amongst the best in the Alps with excellent food, hot showers and plenty of beer - open in mid-February, so this is a great early season ski tour. In poor weather, there are lots of interesting options for lower level itineraries.
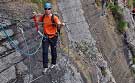
The options for the week-long tour and the exact chosen itinerary will depend on the conditions and the preferences/aspirations of the group. We recommend a tour where you spend a couple of nights in each hut which will make the tour more relaxed with the emphasis on comfort and enjoyment! There are plenty of route variations depending on weather and snow conditions. You’ll need to carry ice-axe and crampons, but there is no 'full on' alpinism involved. making this one of the best ways to step into the world of multi-day touring.
This trip is suited to intermediate to advanced riders who are in good to excellent physical conditions. You should have a minimum of 2 days touring experience, no further mountaineering is required (although you'll finish the trip with plenty!). Riders should have their own equipment, although if you don't just let us know.
For more advanced private groups (guiding ratio 1:3) we can include additional peaks including Piz Buin (3312m) and Piz Fliana (3281m).
Day Itinerary
-
Travel to Landeck. We usually stay in the one of the hotels close to the centre of Landeck and the main train station. Meet up with the guides for welcome meeting, kit check and briefing on the itinerary for the week. Stay overnight in Landeck.
-
We start with a 50 minute road transfer to Ischgl where we'll spend the first few hours shredding, getting comfortable with the equipment, and revising avalanche safety skills. A 1-day lift pass costs about 52 Euros (not included in the price of the holiday). After lunch we catch the lift to the top of the Pauliner Kopf (2864m). We traverse round to the Zeblasjoch (2539m) and transition into touring mode for the 2 hour skin to the Piz Val Gronda (2611m). From here we have a great descent to the Heidelbergerhutte (2264m). This is a traditional yet very well equipped hut with running water and showers.
-
Today we traverse from the Heidelbergerhütte to the Jamtalhütte via the Kronenjoch and taking in the summit of the Breite Krone (3097m). The day involves about 900m of ascent and about 1,000m descent. This hut is state-of-the-art and more like a hotel. It is owned by the German DAV and has a climbing wall, ice climbing tower, showers and fully waitered dinner service.
-
Lots of options depending on weather and snow conditions. On previous visits our preferred summit has been the Hintere Jamspitze (3156m). Another choice is the Gemspitz (3110m). Return to the Jamtalhütte for a second night.
-
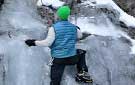
Leave the Jamtalhütte and head for the Wiesbadenerhütte, another well located and comfortable hut. The standard route goes over the Ochsenscharte with an optional ascent of the Dreilanderspitze (3197m). This ascent includes some quite steep terrain and a bootpack up the final few meters to the airy summit.
-
Normally we climb the Fuorcla dal Cunfin (3042m) and continue further to the summit of the Egghorn (3147m). If conditions are good and its possible to climb the Piz Buin (3312m) we will, however this normally requires a ratio of 1:4. Return to the Wiesbadenerhütte for a second night.
-
Our last day - we traverse back from the Wiesbadenerhütte to Galtür. This is mostly downhill after an initial climb and the route takes us down into Bieltal and out by the Rauchkopfsharte, a great line down and the "cream on the cake" for the week. From Wirl we return to Landeck and the hotel by road for our final night and a toast to a cracking week!
-
Depart after breakfast.
Prices include:
- 6 guided days
- all guide fees and expenses
- 7 nights accommodation – 2 nights HB in Landeck, 5 nights HB hut accommodation
Prices do not include:
- travel to/from Landeck,
- local transfers & uplift,
- lunches and beverages.
- personal insurance
- equipment hire
*Single rooms subject to availability and supplement.
BOOK WITH CONFIDENCE
Your Financial Protection
ATOL
£2.50 per person of the cost of any air package is paid to the Civil Aviation Authority to provide ATOL Protection to you. This means the money paid for these arrangements is fully protected. Our ATOL number is ATOL 2911. For more information see our booking terms and conditions.
ABTOT
ABTOT provides protection for your booking as set out in Holiday Information.
Ski Club Winter Arrangements limited (trading as Mountain Tracks)
Registered in England No. 2099115. VAT No. GB 461 5692 34


We accept the following payment methods
![]()
-
Splitboarding - Clothing
When choosing clothing for a day of touring in the mountains you want to think light, warm and versatile. During the trip weather conditions will change and you’re likely to go from warm afternoons where you’ll be carrying most of your gear in your rucksack, to icy-cold mornings when you’re wearing everything to keep warm! Getting hold of the best and lightest kit available is always worth it and most of the major brands will be able to supply a suitable kit.
This season, we’ve partnered with Ortovox to provide us with the very best safety kit and clothing. Our guides will all be decked out in the latest Ortovox jackets and trousers and will keep warm, dry and comfortable thanks to their technical wool base- and mid-layers. Our guides couldn’t recommend their kit more highly.
- Roll neck rather than a scarf. We use and recommend the 'Buff' a light, stretchable tube. Excellent despite the name! They do both a fleece/cotton version for warmth or just a cotton one (to keep the sun off).
- Headwear to include warm hat and sun-cap or wide-brim hat for extra protection from the sun. Mountain Tracks fully supports the wearing of helmets for skiing, Mountain Tracks guides are allowed to enforce helmets if they think it is required if you are unsure please contact us to clarify.
- An outer shell jacket made of waterproof and breathable material like Gore-Tex or similar with a built-in hood. The lighter the better and so a shell is recommended rather than an insulated jacket.
- 1-2 thin fleeces - rather than a thick layer between your skin and the outer shell - an approach which gives better heat retention and good flexibility. These tops are known as ‘mid layers’. The principle of ‘layering’ e.g. allowing you to easily add/remove layers depending on the temperature and the activity is recommended to ensure comfort on the mountain.
- Insulation layer like a down or Primaloft jacket is a good item to have ready to wear in the event of cold weather, it can live in your rucksack as a spare layer and can come in very handy for sudden changes in the weather.
- For the lower half, it’s essential that you have a pair of thermal base layer pants (long johns).
- These can then be combined with either: (a) a good pair of ‘technical shell’ pants in a waterproof and breathable fabric like Gore-Tex (b) a pair of mountain or alpine pants in a softshell material together with a pair of lightweight, breathable over trousers with long side zips.
- Top and bottom underwear made of a synthetic, wicking material. Very popular at the moment are the wool based layers from companies such as Ortovox. They are comfy, breathable and warm when needed and can be worn for days without your friends catching a whiff!
- Good quality Gore-Tex gloves or mitts and a thin pair of softshell or fleece gloves for when it is hot and for touring in. Silk inner gloves can be useful if the weather is cold and you suffer from cold hands.
- Technical Socks - Investing in good quality ski or snowboard socks will improve fit, warmth and feel when skiing for long periods. Bring along a few pairs.
-
Splitboarding - Equipment
For all splitboarding trips, it is essential that you riding a fully functional splitboard. Snowshoeing is not suitable for multiday hut to hut touring.
Splitboarding is still gaining traction in the rental market. This means that currently many resorts around the alps have little or no splitboard rental options. We are always on the lookout for rental options and are happy to help you find a solution if you are having trouble finding rental equipment.
Splitboard
Splitboards come in many different shapes, sizes, configurations and weights. For hut to hut touring you should always look for a lighter weight setups or easy to use hardware. If you are joining a day touring trip or off-piste adventure advanced course where you will be doing short tours with a focus on powder hounding - surf or fish style boards are sensational, as will be any all mountain or freeride designed split.
There are lots of different brands on the market. Currently, the quality of build, uphill and downhill performance can vary and the price isn't always a direct indicator or performance. With such growth in the industry, we recommend you get in contact with us if you have any questions about purchasing a splitboard. Our team has a huge amount of splitboarding experience and we love to talk kit!
The length of your ride is a pretty personal choice. For backcountry riding, we recommend a board that stands about equal height with your nose with the tail of the board flat against your big toe. Directional flex or a setback stance is beneficial for crushing avalanche debris and generally cruddy snow that you will almost always encounter on long descents.
Width should be a major consideration. although a wider board will float better, they can be an utter nightmare in touring mode. The extra width can make it very difficult to hold the inside edge when traversing uphill on firm snow. This problem is amplified by the flexible nature of soft snowboard boots. a board that is too wide will sap your energy and ruin your day.
Boots
There is currently a confusing array of boots on the market. It is important to note that you do not need splitboard specific boots, but they do have some benefits. Any stiff all mountain or freeride snowboarding boot will do the job, If your boots are soft or flexed out from a few seasons use you may want to consider a new pair.
Splitboard specific boots are typically very stiff, they have sole which is suited to scrambling uphill on snow and rock. The sole is often wider and with a square edge to help you gain a mechanical advantage over the waist of your ride while in uphill mode. Finally, they may have a lip on the heel of the boot which is suitable for semi-automatic crampons. If you boot cannot take a semi-automatic crampon you can simply use something like a Grivel G-10 as an alternative.
Hard-booting is becoming more popular each year and is worthy of consideration for any keen hut to hut tourer or aspiring splitboard mountaineer. With rapidly evolving tech and fresh ideas each season its best to email us if you have any questions about hard-booting.
Bindings
Splitboard bindings have advanced in leaps and bounds in recent years. In this instance, you typically do get what you pay for. Cheap binding conversion kits are okay but not great and we really don't recommend these. Bindings form a critical part of your setup and it is worth investing time into researching the different configurations and considering how they will work for you when you are deep in the backcountry. Every gram of weight matters, the lighter the weight the higher the price is the general trend, the prices can be eye-watering but it if your serious about where your ride will take you, it is worth it.
Ski Poles
Poles that collapse into three sections are perfect. Cheap poles can and do fail, freeze, seize and rust. Trust us, if your pole breaks or fails it is a serious problem. When heading uphill the pole needs to hold your body weight and you need to trust it won't collapse or telescope back into a kiddies pole suddenly as this could lead to a series injury, long fall or an uncontrolled slide back down the mountain.
Rucksack
For most trips especially multi-day hut-to-hut tours you will need a 35 - 40-litre rucksack. You might get away with a big 30-litre pack if you are an experienced tourer and know what to pack. Most people will find a 35-40 liter pack is a good size for touring. You should only consider rucksacks which are designed for backcountry and multi day use.
Key features of a good splitboarding pack:- a method of attaching your board in either an A-frame (one paddle split either side) or both together on a vertical carriage
- easy access into the main compartment without having to empty the sack to get something at the bottom
- separate pocket for avalanche shovel, handle and probe
- small top pocket for items like wallet, sunglasses/goggles etc; an ice axe loop
- a built-in rain cover and a secure method of attaching/stowing a ski helmet
- good hip/waist belt and adjustable shoulder straps
Avalanche airbag rucksacks can be used for touring but they are heavy, adding somewhere between 5-8kg just for an empty pack plus canister. So unless you are sure you can carry it and fit all you need in, we do not recommend you use one.
Over a long multiday tour, every gram of weight is important as you have to carry and move it yourself. Carrying a heavy pack will hinder and tire all but the most experienced and fit ski tourer.
-
Splitboarding - Technical kit
- Skins – these are skins which, now made of artificial fabric, stick to the bottom of your board when it is in touring mode, skis and allow you to walk uphill. They must be cut to fit your paddles exactly, so if you are bringing your own skis you must provide your own skins.
- Board Crampons (aka couteaux) - most bindings have ski crampons specifically designed for the binding. We always carry these just in case. Again if you are bringing your own ride and bindings you must provide your own ski crampons.
- Ice Axe - general lightweight mountaineering / alpine pick. Ideally, this needs to be short enough to fit in your pack.
- Boot Crampons - ideally lightweight aluminium ones although steel crampons are required for more demanding tours
- Climbing Harness - a simple lightweight harness. The key feature is that it should have fully adjustable leg loops for putting on over ski boots, crampons, etc.
On some tours in non-glaciated terrain, an ice-axe, boot crampons and climbing harness may not always be required. However, as conditions and itineraries can change we do generally recommend that you bring these items with you. If you do not own these items they can be rented to you by our guides or via one of the local sports shops -
Ski Touring - Safety Equipment
The “Safety Trilogy” - required on all our ski tours and off-piste courses.
- Avalanche Transceiver/Beacon
- Snow shovel
- Avalanche probe
We recommend Simple and intuitive ORTOVOX AVALANCHE RESCUE KIT 3+
Remember it is not enough just to carry this equipment; you have to know how to use it.
How about joining one of our specialist avalanche courses – check out www.mountaintracks.co.uk/activity/avalanche-training
-
Ski Touring Skills - Accessories
- Good pair of ski goggles with a lens for low light is essential in the event of snow and poor visibility
- Good quality sunglasses with 100% UV protection
- 30-35 liter rucksack
- 1 – 1.5 Liter water bottle – we don’t recommend hydration systems (e.g. camelbak) in winter as they can freeze.
- Food – bring some of your favorite hill nibbles (chocolate, energy bars)*
- Suncream and lip salve
- Camera with a large capacity memory card!
-
Splitboarding - rental/hiring
Splitboarding is rapidly growing however, it is still not yet at a level that rental shops can readily own a supply of quality equipment. Many resorts around The Alps currently have zero stock for rental. Chamonix is an exception to this rule, and one of the main reasons many of our entry-level courses are based here.
At Mountain Tracks we are tracking rental options as we discover them, please make contact with us if you require some help finding the equipment you need.

Landeck is the main town at the head of the Paznaun valley in the Austrian Tirol.
Getting to Landeck
The nearest airports are Innsbruck, Munich, Friedrichshafen and Zürich.
To get to Landeck from any airport you need to take the train. Landeck has its own railway station - known as Landeck-Zams.
Journey time from the airports:
From Innsbruck airport: 90 minutes. Bus from the airport to Innsbruck HBF and from there direct to Landeck-Zams. Frequent trains throughout the day.
From Friedrichshafen Airport: 3-4 hours. The route is via Landau and Bregenz.
From Munich airport: about 5 hours.
From Zurich Airport: about 5 hours.
Details of all train connections can be found on the Austrian Railways website at www.oebb.at
-
Insurance
It is a condition of booking that you are insured for your chosen activity and the cover must include medical expenses, personal accident, personal liability, third party risks and rescue (including helicopter rescue). You are strongly advised also to take out cover against cancellation and curtailment.
For UK residents Ski Club Travel Insurance may be a suitable option.
For more details and to purchase a policy online visit http://www.skiclubinsurance.co.uk/
If you need assistance arranging your personal insurance please let us know.
-
Getting to Landeck
Landeck sits at the end of the Paznaun valley. The nearest airports are Innsbruck, Munich, Friedrichshafen and Zürich.
To get to Landeck from any airport you need to take the train. Landeck has its own railway station - known as Landeck-Zams.
Journey time from the airports:
From Innsbruck airport: 2-3 hours. Trains run at least every hour between Innsbruck airport and Landeck-Zams.
From Friedrichshafen Airport: 3-4 hours. The route is via Landau and Bregenz.
From Munich airport: about 5 hours.
From Zurich Airport: about 5 hours.
Details of all train connections can be found on the Austrian Railways website at www.oebb.at
-
ETIAS & EES
ETIAS (European Travel Information and Authorisation System)
-
What is ETIAS?
- Starting in the first half of 2025, travellers from over 60 visa-exempt countries will be required to have an ETIAS travel authorisation to enter most European countries within the Schengen Area.
- ETIAS enhances security by checking the details of travellers before they arrive.
- It is similar to systems like the ESTA (USA) and eTA (Canada).
-
Who Needs ETIAS?
- Travellers with British passports or passports from other visa-exempt countries must complete the ETIAS process.
- Holders of EU or Schengen Area passports or valid EU/Schengen Area visas are exempt.
-
Application Details:
- ETIAS costs a 7EUR processing fee, waived for those under 18 or over 70.
- Validity: Three years from application, tied to your passport’s validity.
- New passport = new ETIAS.
-
Application Form Questions:
- Basic personal details (e.g., passport info, name, address, citizenship, gender).
- Additional questions during the process (e.g., criminal history, past travel, health).
-
Application Fee:
- 7EUR euros.
- Electronic payment via debit/credit card.
-
Approval:
- Most applicants receive approval within minutes.
- Valid ETIAS visa waiver for three consecutive years.
Remember to apply for ETIAS approval to explore your favourite European destinations! More details will be confirmed by ETIAS authorities. You can find additional information at the following links:
EES (Entry/Exit System)
The Entry/Exit System (EES) is an automated IT system developed by the European Agency for the operational management of large-scale IT systems. Its primary purpose is to register travellers from third countries each time they cross an EU external border. Here are the key points:
-
What is EES?
- The EES is an automated IT system designed for registering non-EU nationals travelling for a short stay.
- It records and stores the date, time, and place of entry and exit when these travellers cross the external borders of European countries using the EES.
- The system calculates the duration of the authorized stay and generates alerts to EU Member States when the authorized stay expires.
-
Who Is Affected?
- The EES applies to non-EU nationals travelling for a short stay (up to 90 days within any 180 days) to European countries using the EES.
- Exemptions apply; for example, holders of EU or Schengen Area passports or valid visas are exempt from EES registration.
-
Advantages of EES:
- Saves time by replacing manual passport stamping.
- Automates border control procedures for more efficient travel.
- It helps identify travellers who overstay or use fake identities or passports.
- Contributes to preventing, detecting, and investigating serious criminal offences.
-
-
Accommodation Information
On this tour you will stay in some of the most comfortable alpine huts in the Alps. Most have running water, showers, drying rooms and even duvets! Food is plentiful and nourishing.
A sleeping bag liner (cotton or silk) are compulsory in all of the huts.
At the start and end of the tour you will stay in a comfortable hotel in Landeck which offers good access by road to the skiing on the first morning.
Location

Gallery


View Gallery
 Travel Website Development